Care and Use of Surplus Military Mast Poles
I was first exposed to the use of military surplus masts during Field Day in 2017. I have never seen a kit that included everything needed to erect a 40-foot mast, even the hammer. I started looking for one of these kits, the fellow members of the club kept talking about how they got theirs and how inexpensive they were… Those days were long past, the 40 Ft mast kits are now $400 – $500 if you can find one. I would still love to have one.
Most of the 4-foot poles that are available now are from the Camouflage Netting Support kits. They are designed to hold up a camo nets 8 – 12 feet off of the ground. These kits normally have spreaders and tent stakes included. The spreaders can be used to offset the antenna from the poles. What these kits normally do not come with is the guy lines and guy line adapters. If you are going to be putting any of these masts, you will definitely want to use guy line.
The Support Poles

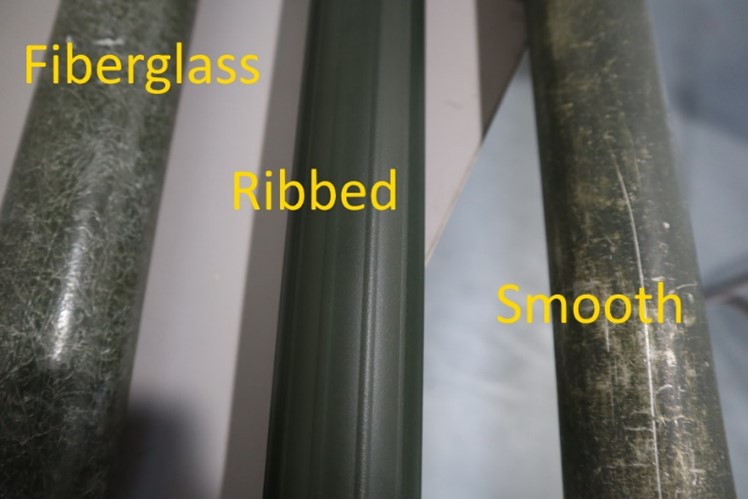
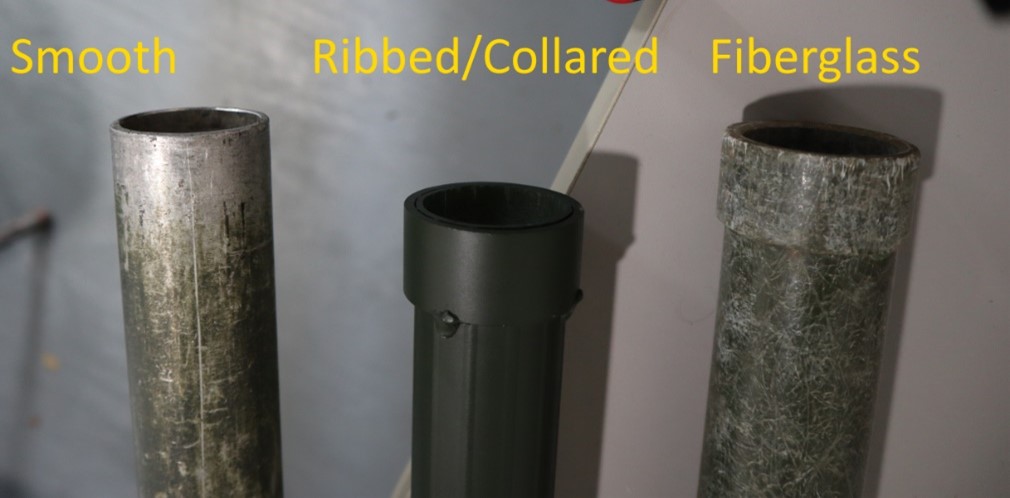
The poles themselves are easy to locate and purchase, if you can get them locally you will save on shipping charges which can cost as much as the poles. There are three types of surplus military poles:
Fiberglass
These are light, portable 4-foot poles. These are especially useful for short masts. I did have one up 24 feet and guyed at the top, when taking down the mast I heard a cracking noise and was showered with very sharp shards of fiberglass and the poles that were above the broken pole. Even after this experience with the fiberglass poles, I would still use them when the mast height called for is 8 – 16 feet in height.
Aluminum – Ribbed
These are the most recently manufactured poles available. They are made of thinner material than the older WWII surplus poles. These can easily be identified by the ribs running the length of the pole and a collar on the bottom of the pole to give the thinner aluminum strength. I have now realized that some of the newer push up kits are using these poles and cutting off the collar at the bottom. These poles are not as strong as the older smooth poles and are now 46inches rather than the 48inches. If you use a push up with 6 of these, what you thought was a 24-foot mast is now a 23-foot mast.
Aluminum – Smooth
These are the older WWII poles. These poles have thicker material than the ribbed poles mentioned above. During the days that these were being produced, the manufacturing did not allow for the strict adherence to standards as we have now. You may find that the outside diameter maybe a few thousandths of an inch bigger or smaller in each pole. With that, some of the poles may feel a little tighter on the tripod. The paint on most of these poles are dull or missing, but since they are aluminum, they will not rust and lack of paint will not affect them. I would not suggest painting them as it may make the pole more difficult to push through the tripod.
Putting the Mast in the Air
The masts can be raised several ways.
Swivel Stake
Most common is a swivel stake that is like a universal joint attached to a spike. The pole is assembled and then the bottom of the pole is inserted into the swivel stake and the pole walked up to position. As this method requires guy lines to stand, you may need more than 1 person to erect this kind of mast. I have seen this method used up to 40-feet with the smooth aluminum poles using two to three sets of guy lines.
Tripod Push Up
Another popular way to erect these masts are using the tripod method, this is called a push up mast. These masts normally utilize 6 of the collared ribbed aluminum poles attached to a tripod support base. After getting the base assembled, the remainder of the mast is completed by inserting the smooth non-collared aluminum poles up through the bottom of the tripod until you reach the desired height. I have put up these up to 28-feet by myself in the past. These are reliable up to 32 feet using two guy hookups (8 guy lines total). As mentioned before, some of the new mast kits are including the ribbed poles with the collars cut off. Remember, this is a lighter thickness pole. I have put these lighter poles masts up to 28 feet with guy lines. Keep in mind that these are not as rigid as the older smooth poles.
Support Pole Or Stake
The final method I have seen used is a post or stake driven into the ground and the poles dropped over the stake. This is a little harder to erect and would also require guy lines. This setup is best used when you are erecting masts less than 20-feet.
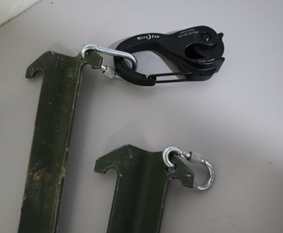
Clamping to Building or Post
I have used truss clamps for attaching poles to buildings or existing poles with very good results. The truss clamps were designed to hold stage lighting. There are also pipe hanger clamps that can be used as well. These clamps allow for a secure and quick way to raise, clamp and lower your mast.
Always be careful when erecting masts and make sure people are around you in case you need help.
Maintenance and Tools
As with anything that is going up and down consistently, there are a few maintenance objects that need taken care of.
Aluminum poles can get bent, dented, dirty and several other things. If the aluminum pole becomes bent, there is no good way to correct this. Best thing you can do with the bent poles that are not too badly bent are to use them as the very bottom pole. Trying to bend back to poles can result in the poles being weaker and even bent more.
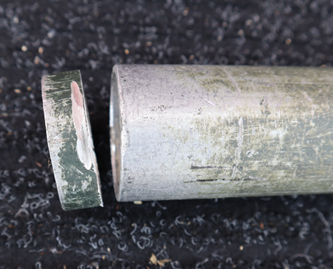
If you are having trouble getting your pole to slip together, you can try to ream out the bottom or top of the pole. You can also try to file the edges, but this can be very time consuming and can be frustrating. If the bottom of the pole is not quite round anymore, you may be better off cutting off ¼ to 1/2 inch or so of the pole. You can do this with a hacksaw or a cutoff tool with ease, try not to heat the pole as the pole will get weaker if heated too much.
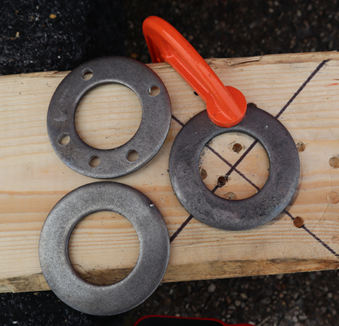
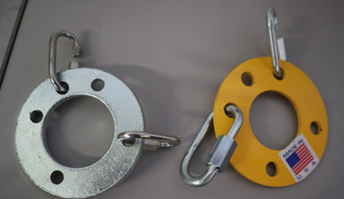
Guy Rings
Guy rings are normally made of metal and have 4 to 5 holes drilled or punched into them. I have started making mine from large washers. The outside diameter of the pole top is 1 5/8 inch, you should be able to find or order these washers at farm supply stores. Making your own guy rings can save you 75% over purchased rings. You can paint the rings if you like a finished look but you will need to boil the washers to get the rust inhibitors out. I have also seen guy rings made on 3D printers. These work fine in most cases but make sure to check them before and after each use for cracking and wear and tear. Make sure that the printed guy rings are thick enough to safely support the mast.
Guy Lines
You can use any types of rope of cord for your guy lines. I try to use paracord or rope rated at 250lbs or better. When attaching the guy lines to the guy rings I use quick links (D shaped carabiner like connecters), these help keep the metal holes in the guy rings from cutting or damaging your rope.
Tent Stakes
Most of the support kits comes with large military tent stakes, if your kit did not come with any, you can check with Military Surplus stores or order online. These tent stakes will cost you about a dollar each and are very sturdy.
Guy Line Tensioners
If you are good at tying knots, my hat is off to you, I am not. I have found two things that work well for me. My preferred method is using a product called CamJams. You insert the rope into one side of the clamp, then use the cam on the other side to adjust your tension.
The other method is using what is called a Dog Bone. The Dog Bone is a peace of plastic or resin that has a hole at each end. You loop the rope through the dog bone and then tighten by pulling the end with the rope knot. When you release the dog bone, tension is placed on the other end of the Dog Bone creating a friction hold on the rope.